Monday, September 17, 2012

Ice cream cone cupcakes!


 For a golden birthday of sorts of the triplets turning 3, I decided to make ice cream cone cupcakes for the celebration.  They were super easy, cute and a big hit!  I gathered a few helpful hints that I used to make these cupcakes, chosen because they seem to be repeated by the majority.

- 1 box of confetti white cake following the instructions for cupcakes
- 1 package of colored ice cream cones, placed in a muffin tin covered with tin foil.  Using a knife or fork or something to penetrate the foil then put the cone in so it was secure for cooking. 
- I filled the batter near to the line (pictured below) and after they cooked I wanted a bit taller for the so I filled the cones to the line, which was perfect.
  
- When the cupcakes were done cooking I immediately removed them to a drying rack to cool and  punctured the bottom of the cone with a fork.  It made sense to do this to help release any condensation to keep the cone from getting soggy BUT really only useful if used same day.   I was cooking mine the day before the party and after fully cooling and storing over night ended up with soft cones to my horror.  If they are soft, just place in the oven on a low temp to help dry them out. I think I heated the oven to 250 and cooked them for about 10min. checking on them regularly.

- Not being a professional cake decorator and never working with frosting tips I decided to give it a go and bought a little decorating bag and tip package from the dollar store only to find frosting that came in an easy dispenser can with tips!  It came with 4 different tips!  ok, so I have no idea how to use any of them but think this is definitely one of the best finds this year.
  - Trouble transporting the cone cupcakes seems to be a recurring theme but I just found a simple solution.  Using a clear plastic cup, I scrunched up some colored tissue paper to fill in some of the dead space, placed the cones and then surrounded the cones by teddy grahams.  I found an unused rubbermaid with a lid to place them in to protect them in the car. I would've used just a cardboard box had I had one.


Saturday, September 15, 2012

Taco seasoning in a pinch!

Taco seasoning is one of the packets I always try to have on hand.  I guess just to try is not enough so I found myself needing and easy dinner, came to the conclusion of tacos and lo and behold, no seasoning.  After skimming a few recipes I tried this one out and the results were great!

  • 6 teaspoons chili powder
  • 5 teaspoons paprika
  • 4 1/2 teaspoons ground cumin
  • 2 1/2 teaspoons onion powder
  • 2 1/2 teaspoons garlic powder
  • 1 1/2 teaspoons cornstarch
  • 1/8 teaspoon cayenne pepper
Because I, for whatever reason, do not have onion or garlic powder on hand I just added one clove of fresh garlic and I also thought 'what's the point' on the cornstarch so I nixed that. In the end I used -
 
  • 6 teaspoons chili powder
  • 5 teaspoons paprika
  • 4 1/2 teaspoons ground cumin
  • 1 minced garlic clove
  • 1/8 teaspoon cayenne pepper
and you know what?  It was perfect!  even the otherwise selective husband liked it!

Friday, September 14, 2012

What is the right age for Disneyland?

I feel like I hear people all to often saying 'we are going to wait until the kids can remember' to take their kids to Disneyland.  To hit the free under 3 years of age limit, we took our kids a few weeks before their 3rd birthday.  It is now a month later and the triplets still talk about mickey mouse land and it is one of their favorite topics to play around.  Yesterday they built Disneyland, they put their FP castle & pirate ship and many other memories from their trip into their mickey mouse land.  They even took had a doll house 'hotel' nearby their park.  Sure, going as a teenager to Disneyland for the first time has its memories but I did not fill my days after running around on the playground or in my room talking and reliving my time spent at Disneyland.  Now I ask you - what is the right age? Is it worth the parents money for their child to remember it or to play and live the excitement from their day Disney regularly?  For me personally it just makes me smile to see how much my kids truly enjoyed their day at Disneyland by hearing them talk about it and reliving it, it was worth every penny and every minute. 

Thursday, August 30, 2012

Granola!

Being a fan of granola and thinking I might actually eat breakfast more often I decided to see if I could save money and make some.

Following the below recipe from this website, I was pretty impressed with how easy it was to make granola.  Also it didn't cost much since I was able to buy the ingredients in the bulk food section.  Since making granola is a no brainer, it is a great recipe to make with kids and I'm excited about future batches and using some creativity.  I've eaten with plain yogurt, added it to the kids cereal and we also took some to the park to munch on overall a winner in this household.

Homemade Granola Recipe:

3 cups (300 grams) old-fashioned rolled oats (not instant)
3/4 cup (75 grams) sliced or slivered almonds
1/2 cup (45 grams) raw sunflower seeds
1/2 cup (45 grams) raw pumpkin seeds
1/2 tablespoon (5 grams) wheat germ (optional)
1/2 tablespoon ground cinnamon
1/4 teaspoon salt
2 tablespoons canola oil or 2 tablespoons (28 grams) unsalted butter, melted
1/2 cup (120 ml) pure maple syrup (preferably Grade A Dark Amber)
1 cup dried fruits (cranberries, cherries, apricots, dates, figs, and/or raisins) (optional)

Preheat oven to 325 degrees F (165 degrees C) and place rack in the center of the oven. Either butter or line a baking sheet with parchment paper.
In a large bowl combine the rolled oats, nuts, seeds, wheat germ, ground cinnamon, and salt. 
In a small bowl, stir together the oil (or melted butter), and maple syrup. Pour this mixture over the dry ingredients and toss together, making sure all the dry ingredients are coated with the liquid. Spread onto the prepared baking sheet and bake for about 30 - 45 minutes or until golden brown, stirring occasionally so the mixture browns evenly. (The browner the granola gets (without burning) the crunchier the granola will be.) Place on a wire rack to cool. You will notice that the granola may still be sticky when it is removed from the oven but it will become crisp and dry as it cools. Make sure to break up any large clumps of granola while the mixture is still warm. Once the granola has completely cooled, store in an airtight container or plastic bag in the refrigerator. It will keep for several weeks.
Makes about 5 cups.
Note:  Once the granola has cooled completely you can add a variety of dried fruits; cherries, cranberries, raisins, and apricots are popular choices.


Tuesday, August 14, 2012

Milk shakes, back to the basics

Summer heat, lack of inspiration and kids without much of an appetite led me back to my childhood and a favorite snack, milkshakes!  Easy, cool and a yummy afternoon treat how can you go wrong?

Get your blender ready.....
Toss in a handful of Ice
Milk, it is a milk shake after all, I would say I put up to about 2/3 of the ice with milk
handful of strawberries or other fruit

When I was a kid I liked making banana milk shakes but the bananas always seemed to be green, having no patience I would just throw in a little sugar to off set the bitter, green banana taste.  With all the diets and low calorie recipes out there I'm pretty sure a simple ice, milk, fruit shake keeps the calories low and taste high.

Sunday, August 5, 2012

Banana, Nutella Bread

A favored banana bread recipe in our house nutella - swirled banana bread.  It's decadent so not repeated as often as it is craved.  When I was whipping up a batch this afternoon I was inspired to put stripes of the Nutella mixture instead of swirling it, because, well stripes are fun.  No matter striped, swirled, mixed in, this is good bread and a must try if you haven't.  I unfortunately did not get a picture of piece of the bread, the vultures (aka husband & kids) got to it before I had a chance to remember.  


Wednesday, August 1, 2012

The Gear. On the go with triplets! Part III

After the kids outgrew their snap & go car seats they simultaneously outgrew their Tripledecker stroller.  There are toddler seats that you can purchase to use in the Tripledecker, you can even use the toddler seats that attach to a bicycle.  We opted to not go this route when I found this amazing stroller.  When I say amazing, I mean life saving, awesome, easily lets me go anywhere with my triplets.

Without further ado.......Valco, Twin Tri Mode Ex stroller with Joey attachment. 


Why I love this stroller -
1. lightweight, it is a jogging stroller after all
2. folds easily, unsnap each side and then step on it
3. takes up little room in the car, it does carry 3 kids after all
4. accessibility, if a door is handicap accessible this stroller will fit!

Love, love, love.  The kids are 3 now and I still use my Valco stroller for regularly outings and the occasional stroll through the mall where I need to keep them contained.  If you have triplets and want independence to be out and about with them this is a must!   It seems like an expensive set up but we got the Twin Tri Mode off of Craig's list for $250(!) and then only had to buy the separate Joey seat.

Tuesday, July 17, 2012

Refreshing cocktail, a reminder of relaxing spa time

Cucumber water, cool, simple, light a great spa refresher.  How to bring it home to an equally described drink in cocktail form?

Muddle (squish up w/back of the spoon) 2 slices of cucumber
1 shot of HENDRICK'S Gin
Tonic

over ice and voila, seriously I'm not a G&T girl but I LOVE these Cucumber Gin & Tonics, so delicious!

Thursday, July 5, 2012

Easy, edible thank you


I love my 'I'm so brilliant' moments. Our landlady helped watch over our two cats while we were on vacation last week and we were at a loss as how to thank her. She's older and has her own business and done well for her self, translate has everything she wants/needs and doesn't need some silly souvenir from our vacation.  The sun is shining, finally, and it is a beautiful summer day so I decided to bring a little taste of summer to her and made an Edible Fruit Bouquet.


It was super easy to put together.  I ran by the Dollar store and bought a really cute painted, terracotta pot and some wood skewer sticks then on to the grocery store for fruit.  Admittedly, I did buy canned pineapple as I thought it would help me get it done faster since it would already be in a nice round shape but they were too thinly sliced and hard to work with.  Also, the raspberries & kiwi didn't hold up well, they were too fragile.  What did work was cantaloupe for adding bulk, mainly in the middle of the bouquet, strawberries, orange slices & blueberries

I ran cling wrap over the top of the pot and secured it with a rubber band which I then tied a pretty bow around it to cover it up.  Poking the skewers through the cling wrap worked well and added a little security to hold everything together.  I'm not sure how to change this for the future if I make another.  Also, the flower pot I bought was great since it was a pot & saucer in one so it added weight to the base, I imagine just a pot might tip over easy.

Thursday, June 14, 2012

Kale Chips for the kids

KaleThe buzz in our toddler classes, when talk of healthy snacks comes up, has been Kale Chips.  The moms have been bragging about just how easy to make and healthy they are.  The idea of Kale chips intrigued me, not because my kids aren't great eaters but I find it hard to find snacks with crunch that are healthy.  Also my first and last run in with Kale was when it showed up in an organic vegetable delivery box.  I could not seem to wash away the grit enough and so it was like eating spinach with sand and the taste was not impressive.

The most basic and quick recipe I heard was after washing, toss with a little olive oil, put them on a cookie sheet in a single layer, sprinkle with salt and bake at 400°F for 5min*.
*ok, so this really, fast 5min cooking did not work, at least with our oven.  In the end it took 25min before they were crisp

The chips were only o.k. partially because I skipped on the salt on half of them but honestly they need a little salt.  The best was when my husband added his touch to the unsalted chips by sprinkling a bit of soy sauce, yum!  The kids enjoyed them quite a bit but warning!  they are super messy and crumble into tiny, green specks.

As I like to involve the kids in food prep as much as possible there contribution was to tear up the kale and they even instinctively knew to separate the leaves from the stems.
Kids_Kale

Wednesday, May 23, 2012

Peas & Carrots for our outdoor kitchen

We collected small stones that were the perfect size to paint up some peas & carrots for outside play.  I had no idea what a great time consumption this would be, it kept the kids busy for a nice chunk of time.  They took the job pretty serious and seemed to enjoy having something other than a paper to paint on.


Monday, May 21, 2012

Our first home made I Spy books

The kids had fun with this activity, it was only because I ran out of contact paper that we didn't do more pages.  I spent a lot of time scouring weekly sales flyers and clipping pictures that the kids could relate to, ladders, fruits, vegetables, wheelbarrows, tents, flowers and the list goes on.

Misc 012  Misc 003 
 Misc 002Misc 008 (2)
Clear contact paper from the Dollar store that I cut into little book sizes worked perfect as I knew sticking the pictures to the sticky paper would be easy for the kids.  Also, using contact paper avoided any glue mess.  I taped the pages to the table sticky side, put the clippings in reach of the three kids and added kids! 
During nap time, I covered each page with another sheet of contact paper and added color backs with double sided tape.  The kids love their 'I spy' books!  We'll continue to add more pages as time goes on but for now everyone is happy with their two page books because they made them all by themselves.

Friday, May 18, 2012

Spot Like - eMeals

I can't save enough about eMeals, it saves me time, money and my marriage!  What is eMeals?  It is an online meal planning resource.  If you are  a savvy a cook and have time then it is probably not for you.  I am not a cook and I have had little time to learn with the arrival of our triplets 2.5yrs ago.  This website offers weekly MENUS and a SHOPPING LIST and it gets better....they scour the sales flyers at a number of stores so the plan you pick is based on the weeks CURRENT SALES!

The meals are easy to prep and after you have been a regular customer as myself, you learn how to move the menus around for more variety and what ingredients to have on hand when you do find a good deal or if you belong to one of the wholesale stores.  It only costs $5 per month if you buy the 12 month plan for someone to tell you what to cook and what you need to buy!

My husband was pretty unimpressed with my cooking prior to this discovery so when I became a stay at home mom I figured it was the least I could do to provide a nice warm meal for him.  I feel like an amazing chef now days and have stashed away some of my favorite meals for future dinner parties.  My husband is also very happy about having a wife that cooks!

Love, love, love eMeals!

eMeals Easy Meals for Busy and Frugal Families
EMEALS EASY AND DELICIOUS DINNER RECIPES

Wednesday, May 16, 2012

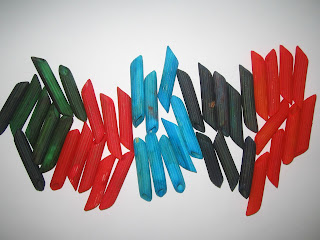
Making colored pastas, pass or fail?

This blogger made some really pretty colored pasta, so I thought fantastic, I'll give it a go.  Thank goodness my kids are forgiving as mine did not turn out as pretty.

We try the best we can to do things with as little impact on earth as possible so I decided to use a glass pasta jar instead of a plastic bag to do the dyeing.  I figured red would be a good solid color to do the test run with. After a half day of dyeing this was the result using vinegar & food coloring in a glass jar, shaking it variously and letting the kids shake it up as well.

I added more food coloring and let the noodles soak but honestly things didn't change much so I had to dig up a plastic bag.  As you can see by the picture above the results were well, disappointing.  Too much vinegar?  Glass jar not a suffocating enough seal?

I poured out the liquid and started with a lot less vinegar and more food coloring now in a plastic bag.
I'm not sure what happens when I get excited about little projects like this but here are the results and they are for me a bit of a let down -
I know it is very hard to tell but from left to right, Green, Red, Turquoise, attempt at Purple that came out Black and in spot #5 Orange.....  The beauty of being a mom of 2.5 yr olds is that they think these noodles are super! They love them and have had the best time sorting the colors and stringing them but their favorite activity is to pour them from cup to cup.

I would say for the finished product mom failed, I won't be selling my pasta jewelry any time soon.
From the triplets perspective it is a pass, they have no idea what they are suppose to look like and they are entertained, double bonus!

Friday, May 11, 2012

Super quick, super yummy mini quiche


ok, so I felt like a gourmet chef when I pulled off these mini quiches recently.  I found some mini pastry shells in the freezer that were leftover from making mini pumpkin tarts for Thanksgiving, yes that old.  The pack was unopened so I figured they couldn't be that bad.  I happened upon this Martha Stewart recipe which I used for inspiration.  What I took from it was that all I needed to do was prep eggs like I was going to make an omelet.  I whisked together 6 eggs, some milk & cheddar cheese, meanwhile I steamed broccoli in the microwave for 6min.  After mixing the broccoli with the eggs I spooned the mixture into the tarts, sprinkled w/more cheddar cheese and topped w/a cherry tomato cut in half since I had them  it gave them a finished look (pre-baked pictured, I forgot to take the fully baked shot).  The MS recipe called for baking for 400 degrees for 12-15min.  I found that I needed to bake them for a lot longer, closer to 30min.

Anyone can do this and they were delicious!  just mix up your favorite omelet, put them in mini pastry shells and throw them in the oven.  I foresee pulling off mini quiches for many future events, they really are perfect for brunches, baby showers, mother's day and for us it made for a really fun dinner that night.
 

Friday, May 4, 2012

The Gear. On the go with triplets! Part II

For their first birthday the triplets received a collapsible wagon.  Admittedly I didn't feel that we needed to keep this wagon since I was already on the wait list with Step2 to purchase the choo choo wagon.  But it seemed it was destined to stay in the family.  I can't believe that I actually didn't want to keep this wagon.  I suddenly had a way to transport the wee three quickly and efficiently from the car to the park or to a class.  This wagon also takes up very little room and is light weight.

I'm not sure how exactly my sister-in-law found this wagon but it arrived from a company called Defender.  When I looked it up it turned out to be a marine supply company and they sale it as a 'Deluxe Folding Red Wagon' and refer to it as a dock cart.

LOVE it.  We also get asked all the time where we got it from.  As the kids have gotten older I find it perfect to take along on walks, they love to push and or pull it and if there is a tired child so much easier then risking how to carry 3 kids back to the car.  We are definitely not ready to retire this wagon.